But... I don't remember how I made it and there are no traces left behind. Wow... I definitely remember making it was very easy and quick...


Fortunately, some photos were found. I tried to guess the process from these photos, but I was still a little unsure, so I tried making a rough copy using black cloth as a sample. First, let's look at old photos.


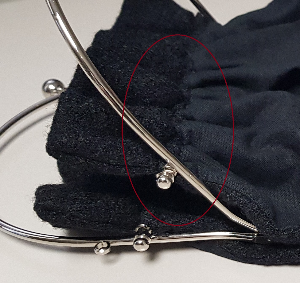
I used two types of fabric: a striped fabric for the outer and an apricot-colored plain fabric for the lining. Looking at the photos above, in the case of the outer fabric, the width corresponds to the depth of the bag, and the vertical is the width of the bag. The metal frame has a width of 15cm, and to allow for sufficient ruffling, it is recommended to have a width of approximately double that, around 30cm (+ additional length if desired). The estimated width is around 60cm. For the sample, I tried 70cm, but it appears slightly longer than I would like it to be. However, there shouldn't be a significant difference. At both ends, I left approximately 10-12cm each for ruffling as a frill around the frame. and in the middle. I placed a slightly thick quilting batting and stitched it in place (for the body of the bag). The side seams of the bag don't require batting. I simply sew along the pattern on the fabric using a sewing machine. Quilting with batting helps maintain its shape and makes it practical and visually appealing. According to the photos, I used red and blue threads to stitch along the fabric in turns. (Hmm... I paid attention to the details...how meticulous I was back then).
When it comes to lining, when completing quilting, measure the size of the quilted area (because quilting reduces the size a little) and cut out. There is no photo but you can imagine. Don't forget to add the top and bottom seam allowances. Then, placing the right side of the outer fabric and lining facing each other, sew them together. One side first, then the other.


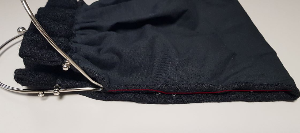
Starting from here, there are no remaining photos of this bag so instead, let's refer to the photos of the sample made for reference purposes. Let's finish off the side of the bag. From the point where the frame ends when you open the frame wide, stitch both sides together using blind stitches. Create the desired width of the bag by stitching the bottom as shown in the last photo.
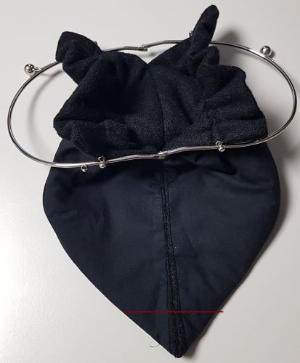
By the way, the frame can be inserted at the very end. In my case, since I was using it as a sample, I just put it on first and did all the sewing, so it came out like the picture ^^; I used a slightly thicker fabric, which made the frills look rough. As expected, using a thin fabric for the outer layer and quilting the body part with a thick and sturdy quilting batting turned out much prettier. Actually, when I have time, I would like to make a bag properly again by decorating it with some white beads or embroidery stitches to a black fabric. Black seems to go well with even moderately elegant classic outfits. Anyway, it's a bag fairly easy to make and can be used practically for many occasions.